Importing Audio CDs and DVDs
Importing audio data from an audio CD
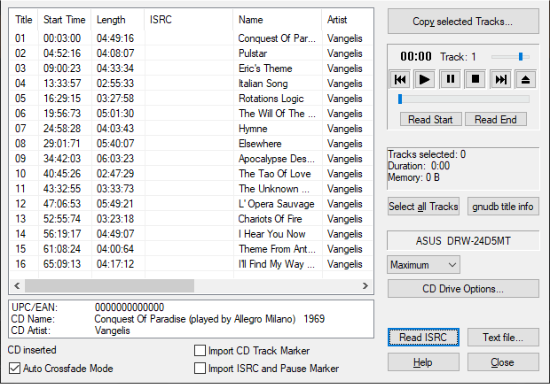
Importing Audio CDs
To import audio CD tracks into a virtual project, choose Menu File > Import > Import Audio CD Track(s)…. The CD Import dialog opens:
-
If you have more than one drive installed, click the CD Drive Options button and select the desired CD drive. Above the button you can see the name of the selected drive.
-
The content of the CD is displayed in the track list. Click gnudb title info to retrieve CD title information from the online CD database gnudb.
-
If you select a track in the list, you can use the playback control to preview the CD track. You can use the slider to access a specific position. To import only a part of a CD track, click at the beginning of the section Read start and at the end Read end.
-
To select multiple titles use the Shift and Ctrl keys, for all titles click Select all tracks.
-
Some options can be set for the import:
-
Auto crossfade mode: Auto crossfade mode is activated in the project and crossfades are created between the imported titles.
-
Import CD track indices: If this option is enabled, CD track indices are set in the project. The markers contain the metadata from the track list so that when you subsequently export to other formats that support metadata (MP3, CD Text when burning to a CD...) you preserve this information.
-
Import ISRC and Pause indices: The ISRC codes are also transferred to the CD track indices and the CD pause indices are also read from the CD.
-
-
Click Copy selected tracks….
-
The Import Audio dialog opens. Choose a file name for the audio file. With File type and Format settings you can also select a file type other than .wav and thus convert the CD tracks to MP3 already during import, for example.
By default, all CD tracks are saved into one file and only objects per each track are created. If you choose the option Each track in its own file with names, you can select different naming schemes in the menu below that derive the file name from the metadata.
-
Clicking OK will copy the audio from the CD drive to your hard disk. You can now copy more tracks from the CD or insert another CD or close the dialog.
Importing Audio DVDs
To import audio data from audio DVDs, select CD or via menu File > Import > Import Audio DVD….
In the dialog Import DVD-Audio you proceed exactly as in the dialog CD import (see above). However, it is not possible to read in only parts of an audio DVD title, the controls for metadata and title indexes (gnudb, ISRC) do not exist for Audio DVDs.
Note: Importing the audio track(s) from a video DVD is not possible!